Lab Resources: ImageJ
You will need to download ImageJ to complete this guide. This is free and open source software:
- ImageJ Image processing and scripting software. ImageJ is widely used in biological and astronomy research (analyzing microscope and telescope images, etc) and is funded by the US Government (NIH). https://imagej.nih.gov/ij/
This guide will show you how to extract positional data from ImageJ. This is not a full guide on the software. I will only explain the one tool which I find most useful and let you explore the rest on your own.
Main Toolbar

ImageJ opens as a bunch of separate windows. When you first launch the program, the above window will be shown. Please select File->Open and select the mjpeg/AVI video file which is created in the Video Processing guide or downloaded from the course page. The first frame of the video whould then open, which has a scroll bar at the bottom to move through the individual frames.
Point Tool
After your image is open you can use the point tool to get coordinates out of your video. The point tool looks similar to a plus sign, and is higlighted in the above screenshot. Somewhat confusingly, to configure this tool by double clicking on the point tool button, which will pop up another window shown below:

Results Window
The two important sections to make are “Auto-measure” (saves the current click location) and “Auto-next slice”(moves to the next frame in the video on each click). By selecting these two options you will be able to quickly record data from the videos by clicking on the object as it moves. Each click will update the results window:
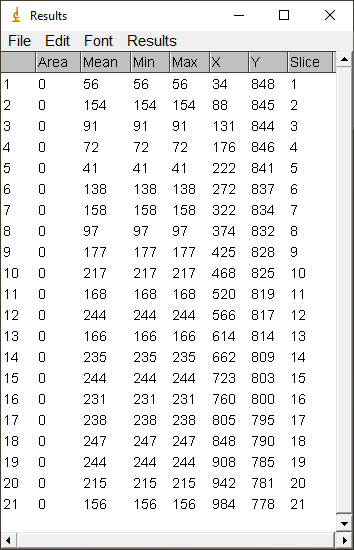
You can then export this data by saving to file or simply selecting and copy+paste into another program (Python, Excel, etc…).